How Long Does It Take To Cook Pho?
You know how when you asked the Pho restaurants how long it takes to cook their broth? And they would tell you \”2 days!\” or \”48 hrs\”? THAT IS A MYTH! I cringed when I hear people say that authentic pho takes 2 days to make the broth or some ridiculous amount of time to do so. Perhaps back in the old days when they just invented pho? Which was when Vietnam was under French colonization. Back then they don\’t have gas stove like we do now, which they had to cook using wood or coal (most likely wood). So taking 1 whole day just to get a huge pot of water to boil is probably the case when they said it takes them a couple days to make the broth, considering the 2nd day is butchering the cow itself. Don\’t take that as a fact though, it is my assumption where this \”2 day\” broth making time came from when Vietnamese restaurant tells people that it takes them THAT long to make the broth. I can tell you that it takes only 3 hours to make a perfectly good broth from scratch with today\’s kitchen standards. While there are a few different methods that I personally use to cook pho depending on how big of a crowd I am cooking it for. I will show you the following recipe to cook the BEST and FASTEST pho you\’ll EVER had. (4-5 servings) The more the servings you make, the more complicated it gets and the longer the prep time depending on your kitchen appliance that are available to you.
The Best Pho Recipe?
There\’s a lot of recipes and videos out there that teaches you the \”correct\” way of making pho; most of whom aren\’t even vietnamese! Not that I have anything against non-Vietnamese people cooking pho, but the taste pallet of a Vietnamese person who grew up eating pho most of their lives, should know better on how a good bowl of pho should taste like compared to those pallet of people of different ethnicity. With that being said, I am 100% Vietnamese, so you can certainly trust me on this recipe. I\’ve cooked and experimented countless times to find the perfect way to cook Beef Pho.
What is the Difference between Pho in the United States compared to Pho in Vietnam?
Traditional Vietnamese Pho have A LOT of Monosodium-Glutamate (MSG), it is one of their main ingredients when cooking. Recently, the health trend forces home cooks to NOT use MSG. They turn to using chicken broth seasoning or vegetables broth seasoning (most which still have MSG but in less abundant). Almost ALL restaurants add an abundant amount of (MSG) in their broth while using minimal beef bones, subbing chicken bones to make the broth. Hence the broth you see at the restaurants are clear and translucent. Since we use Ox-tail, the broth will not be translucent, but it is rich in flavor.

Pho, as served in Vietnam. One key difference when compared to pho in the States is the rice noodles. The rice noodles are freshly made and delivered to the local restaurants and shops early morning. Most people in the states refer to this type of pho to be Northen Vietnam Pho (Pho Bac or Pho Ha Noi).
Leftover Pho Broth
The Pho broth is THE BEST left over! The broth flavor builds up over night and when you heat it back up the next day, it is WAY better than the day before. But be cautious, heating the broth over and over again will make the broth more salty each time. That\’s why it is important to NOT over season the broth the first day otherwise your broth will be super salty the next day. You can always add more fish sauce or hoisin sauce in your PHO bowl when you eat if you wish it to be more salty flavor. Most likely you will have leftover broth. Make sure once you turn off the heat, don\’t touch or stir the broth back up, this will cause your broth to spoil more easily. Let it sit and cool down to room temperature before putting it in the fridge. If your fridge is not big enough, make sure you transfer the remaining leftover broth to a smaller container or pot and let cool. If you cover the broth when it is still warm and put in the fridge, it will spoil!
Here is the list of ingredients as well as a list of \”tools\” you need to make the fastest and best Pho:
Tools:
- PRESSURE COOKER (this will reduce your cooking time and bring out the flavor of your broth)
- Spice strainer pod
- Noodle strainer
- Big pot for broth (10qt – 16qt pot will be good for 4-5 servings, remember there\’s going to be bulky bones and vegetables, so 10qt pot will yield 6qt broth only)
- Other obvious essentials: knives, broth scoop, etc.
Ingredients:
- 3-4lbs Ox tail (try to pick the pieces that are smaller with more bones so that the broth will be more flavorful)
- Your choice of beef steaks (slice thin)(tell your butcher to slice thin for you)(restaurants use round eye steaks for their rare steak pho. If you like lean steak then that is perfect. I like mines to be tender and more beefy flavor so I usually go with ribeye steak or flank steak. You can experiment with your favorite cut of steaks. Just make sure to slice thin.)
- Beef meatballs (optional)
- 2 can chicken broth (make sure read the labels, choose the ones with no MSG)
- 2 can vegetable broth (choose ones with no MSG)
- 1 large Daikon radish
- 6 large yellow onions (yes 6, trust me it will make your broth more mellow sweet)
- 2 large piece ginger root (.5lbs)
- rock sugar (NOT granulated sugar)
- Salt to taste
- Chicken/vegetable seasoning (different brands have different taste.)
- Fish sauce to taste (there\’s different brands of fish sauce, some more saltier and subtle than the other, I use different brand depending if I am cooking it in a broth or for marinade, or making a dipping sauce, etc. For pho, I use: THIS fish sauce)
- Fresh pho Noodles (In Vietnam, this noodle is actually use for Hu Tieu, not pho. But many Vietnamese restaurant use this noodles here for pho as well as this same noodle for Hu Tieu, so it was branded as being the noodles to use for Pho in the States. Supposedly the correct noodle to use for the exact fit to traditional Pho noodle is the thin, flat, rice noodles they used to make Pad Thai. But unfortunately they don\’t offer that noodles in fresh form in most supermarkets yet. I did however CAN find it, but we are so used to eating the other noodles here in the state as a substitute that it became the norm for me.) You can try finding a dried pho noodles which you follow the instruction on the package to prepare that noodle for pho. This dried noodle is the closest to resembling the pho rice noodles that are used in Vietnam. That package looks something like THIS.
- Bean sprouts (garnish)
- Green Onions (garnish)
- White Onions (garnish)
- Thai basils (garnish)
- Fresh Cilantro (or chinese cilantro) (garnish)
- Lime
- Hoisin Sauce
- Siracha
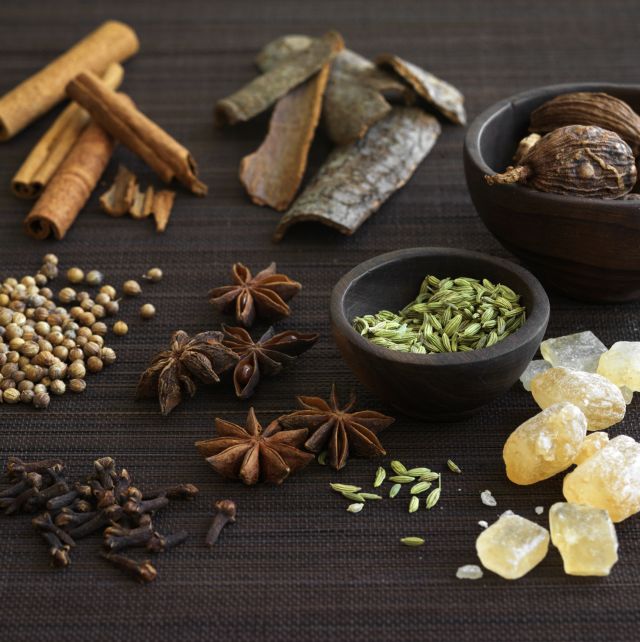
- 6oz Star anise
- 6 oz cinnamon sticks
- 6 oz coriander (cilantro seeds)
- 2 oz black cardamom (can do without)
- 2 oz cloves (can do without)
- 2 oz fennel seeds (can do without)
The last 3 ingredients, you can probably do without. Traditional pho in Vietnam don\’t use these 3 ingredients. Pho restaurants in the States however, do use it. So if you want to have the fragrance like in the states, add the bottom 3 ingredients. The fragrance of the Pho I had in Vietnam is more of cilantro and star anise. Cloves, black cardamom, and fennels are chinese ingredients. They add a stronger and more punctual smell. I prefer the traditional method. If there\’s a Vietnamese supermarket in your area, you can probably buy a packet of the already mixed spice ingredients to make your life easier. It looks something like THIS. 1 pack is probably good for a 10 qt pot.
Instructions:
Step 1
Wash The Ox-Tails
- Put the Ox-tails in your 10qt pot and fill water to cover.
- Add 2 tea spoon of salt. (to sanitize the meat)
- Turn heat till boil and leave to boil for at least 5 min. (you should see a lot of scums float to the top.)
- Rinse Ox-tails under cold water and wash off any scums.
- Ox-tails should not be fully cooked. This process is to get rid of any foul beef smell and to make sure the pho broth is clear.
- Set aside and continue next step.
Step 2


Vegetables for Broth
- Turn your oven on to pre-heat to 400 degrees.
- Gather the Daikon radish, Yellow onions, and ginger root.
- peel the Daikon and onions.
- cut the daikon into chunks (we will discard later, we only use to extract the natural flavor from it into out broth)
- Leave onions whole. (slice halfway through onions so that it can release its flavor more easily into broth.)
- Rinse ginger root (leave skin on)
- Put all on tray and bake in oven for about 15 -20 min or until onions charred on top. (this is to bring out the flavor of the vegetables before infusing it into the broth.)
- After done, turn off oven and move to next step.
Step 3

Pressure Cook
- Put the oxtails, in pressure cooker.
- You don\’t want to fill your pressure cooker up too much with all the other ingredients because the purpose of the pressure cooker is to extract the beef flavor from the oxtail. Filling it with too much of the vegetables, we will get less beef broth extracted from the oxtail.
- Put ONLY 1/4 of the ginger and half of an onion in the pressure cooker with the oxtails.
- 1 tea spoon of salt.
- 2 oz rock sugar.
- 1 can chicken broth
- 1 can vegetable broth
- and fill the rest up to the marked \”maxed\” fill line with water.
- cover, and make sure the pressure is locked is in place.
- If it is too full because you have a lot of oxtail, You can leave the remaining oxtail outside and we can use it on the next step.
- set to \”broth\” on Medium pressure for at least 1hr.
- During this time while it is cooking in the pressure Cooker… we move on to prepping other.
Step 4

Prepping the Main Pot
- While the pressure cooker is extracting the beef flavor, we continue to prep the main pot so that we can combine both pot later to have enough broth for more servings.
- If the pressure cooker is too full, the remaining oxtail can be added to this pot. Remember, we are only using the pressure cooker to reduce our cooking time and bring out more of the beef flavor.
- Use the 16qt pot and fill 1/3 with water.
- Add in remaining oxtails if any.
- Bring to boil. (make sure to scoop out any bubbles, fat, and impurities that floats to the top occasionally. This will help your broth to be more clear. Heat should be set to medium)
- Add remaining broiled vegetables. (make sure you pound the ginger a bit so that it can release the flavor to your broth faster.)
- Transfer all content from pressure cooker when done into pot.
- Add 2 teaspoon salt.
- 4 oz rock sugar (2pcs)
- Total time right now should be around 1.5 hrs – 2 hrs since you started to boil 16qt pot.
- next>>>
Step 5
Spice Prep
- Heat all spice in pan. (3-5min)
- Shake pan constantly to prevent from burning. The purpose is to bring out the fragrance.
- Put all in strainer pouch or container.
- BEFORE dropping the spice container into your broth, make sure your broth has been cooking for at least 2 hrs with the vegetables. strain out ALL the vegetables in the broth BEFORE adding the spice pod/pouch.
- Leave the spice in for as long as you serve the broth.
- The longer is stays in, the richer the fragrance. Take out is you think it is too strong.
- Next>>
Step 6
Adjusting the Flavor
- Add in the remaining Chicken and vegetable broth can. (Originally, I would make my own chicken broth from chicken bones, but that\’s only if I am making 15+ servings.)
- Add 3-4 teaspoon of Chicken/vegetable flavor seasoning
- Taste your broth before adding fish sauce. That way you know how much fish sauce to add in.
- Gradually add in fish sauce and taste as you go.
- For a full 16qt pot, I usually go through at least 1/2 bottle of Tapiro fish sauce. Different brand of fish sauce have different saltiness. So you will have to adjust gradually as you taste.
- Remember that your broth will have to be a bit more salty to accommodate for the bean sprouts, noodles, and other stuff that you will be combining it with.
- If by chance you over seasoned and is too salty, add a bit of water to dilute the broth.
- If by chance it is too sweet because you put too much rock sugar, add vegetable broth or chicken broth along with the same amount of water to balance the sweetness.
- you don\’t want to add too much water that it will dilute the broth\’s richness in flavor.
Step 7

Prep Condiments
- It is obvious that while waiting for the broth to simmer down, the side condiments should have been prepped.
- Bean sprouts, basils, etc. washed and rinsed.
- Limes cut into squeezable wedges.
- Green onions chopped.
- White onions sliced thinly.
- All beef and meatballs sliced and set.
- Hoisin and siracha ready.
Step 8

Final Product
- Bring a pot of water to boil. (4-5 qt)
- Fresh Noodles: measure how much noodles you want and dip the noodles in hot water with a strainer. Shaking and bouncing it so that the milky white water from the rice noodle is rinsed off. Remember that the noodles expand to about 2x that once in the broth, so don\’t over do it.
- Dry Noodles: Follow the instruction on the package to soak the noodles. After soaking and the noodles turns solid white, strained and put aside. Dip in hot boiling water with strainer before serving. This noodle does not expand.
- Put prepped noodles in bowl.
- Add raw sliced meats on top.
- Add meatballs.
- Add chopped green onions and cilantro.
- Black pepper if prefered.
- Condiments on the side.
- Taste broth and add hoisin sauce and siracha if prefered.
Is Pho Worth The Time to Cook?
Is pho worth it to cook at home? Heck yeah! Once you had the perfect home cooked pho, the restaurant\’s Pho will not fully satisfy your cravings. You can add in beef bones if you want a stronger beef flavor, but that will probably take at least 4-6 hr cooking time to extract the flavor from the dense bones. Clear broth only uses bones that does not have any red meat. The red meat has blood stains, hence it will make the broth murky in color.
The BEST way to actually cook pho is to EXPERIMENT yourself! Like everything else, you\’ll get better the more you go at it. Know the basic and just add your own flare, such as… seafood pho, chicken pho, etc. I hope this recipe will be the last recipe you will need to help you make the perfect bowl of PHO for you and your family!
Eat, Love, & Live Happy.
ChefQ (Donny Nguyen)
Very yummy and delicious!